
 Let’s face it, vegan butter is… well, margarine. At best, it’s a butter-like spread. When you remove cream from the equation that’s what you get. I don’t want margarine; I want butter. I love butter. I love everything about it. The way it melts, spreads, whips, creams, browns, and best of all, the way it tastes!
So why research dairy alternatives when I am not a vegan? Because I like a challenge. I like turning something on its head, like blending avocado, tofu, and cacao powder into mousse, reinventing white chocolate, whipping aquafaba into mayonnaise, and maybe someday soon, I’ll curdle coconut cream and create vegan brie cheese, until then, it’s all about butter!
In the dairy world, there’s cow butter, buffalo butter, goat butter, sheep butter, ox butter, and even yak butter, but vegan butter… How do you milk a vegan? That aside, how exactly is butter made? According to industry standards, dairy butter must contain 80% butterfat, although homemade butter is closer to 65%. And yes, you can make butter by beating dairy cream until it turns to butter. But who said butterfat had to come from an animal? An updated definition of milk is, “Any potable liquids resembling milk, such as coconut or soy.” But most DIY recipes using soymilk didn’t even pass for margarine, let alone butter.
The closest approximation came from Mattie over @veganbaking.net, and it is his shoulders, I now stand on. His research on butter’s fermentation, emulsification, and stabilization was the most comprehensive. So I tested his recipe with a few substitutions and the addition of hazelnut oil, which gave it a nutty flavor inherent in the smell and taste of butter when it browns. The French call it beurre noisette. The combination of coconut cream and cacao raised the total butterfat content to 60%—just shy of homemade butter. And by fermenting the coconut cream overnight, I accomplished a European style butter flavor, which has a slight tang Mattie explained in his blog (he really did do his homework).

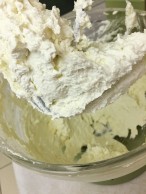
This coco-cacao butter whips, creams, foams, spreads, melts, blends, browns, and taste—with a close approximation—like creamery butter, albeit plant-based. Is it healthier than regular butter or margarine? Well, it is saturated fat, so it should be used sparingly as with any saturated fat.
Recipe notes: You can use any type of mold. Ice-cube trays work well. Then wrap and freeze them for easy use and proportion. Personally, I like having some of it whipped for spreading and making compound herb butters, the rest I keep wrapped in a freezer bag. It will keep in the freezer up to a year.
What you will need: Glass jar, bowl, whisk, hand mixer, and containers for tempering and storing butter. Active prep time: 20-minutes. Inactive time: one day. Yields 1-1/2lbs or 3-cups of butter. Difficulty level: A very easy 3-step process.
 Ingredients:
- 1-cup Kara brand coconut cream in the box
- 1-Tbsp apple cider vinegar
- 1-Tbsp+1 tsp coconut vinegar
- 1-Tbsp+1tsp sunflower or soy lecithin oil (available at most health food stores)
- 3/4-tsp psyllium husk powder or 3-capsules ( also available at health food stores)
- 1/2-tsp Himalayan, or sea salt
- ~~~~~~~~~~~~~~~~~~~~~~~~~~~
- 1 1/2 cups grapeseed oil
- 3-Tbsp+ 1 1/2-tsp roasted hazelnut oil
- 1-cup +2-Tbsp (9 oz by weight) deodorized cacao wafers, melted (250-ml) If ordering in bulk Jedwards offers it at a discounted rate
Preparation:
Step 1
- Pour cream in a clean glass jar, add vinegar, lecithin, psyllium, and salt.
- Stir well to combine ingredients.
- Secure with lid and refrigerate overnight to ferment.
Next day:
Step 2


- In saucepan, heat oil, add cacao wafers and melt, whisking occasionally.
- Remove mixture from heat and set aside to cool to room temperature.
- Pour oil mixture into a bowl.
- Using a hand mixer, slowly add fermented, emulsified cream to oil, and mix well.
- Taste butter and adjust flavor profile. If you like more salt, add more. If you want more tang, add more vinegar. If you want a nuttier flavor, add a bit more hazelnut oil.
- To ensure a cohesive end result, give the butter a good whisking before pouring it into molds and placing in the freezer. The longer it takes to congeal, the higher the chance of separation, which will affect the quality of the finished product.
- Keep in freezer for 1-hour to completely set.
 Step 3
- Remove butter from the freezer and unmold.
- Depending on the mold used, wrap or place in plastic bags
- If you wish to aerate the butter for a spread, set in a bowl and begin whipping on low and increase to high until butter is fluffy, occasionally scraping down side of the bowl
- Scoop butter into the desired container and refrigerate. Enjoy!

The link you provided to the cocoa butter isn’t for food. On Amazon, it says it’s for skin care.
LikeLike
Hi Zoe,
It is food grade cacao butter that’s also used in the cosmetic industry which is why they state: “Great for DIY skin Care.” Hope that helps.
LikeLiked by 1 person
Thank you for telling me! I have been wanting to use cacao butter for making home made chocolate (and I want to try your vegan butter, too), but the ones that advertise being for food are much more expensive! Thank you for replying!
LikeLike
I haven’t used this particular brand. I order directly in bulk from Jedwards International since I use so much of it. And their cacao is organic. I asked them the same question because their post made note of deodorized cacao being used in the cosmetic industry. Depending on how much of it you plan on using, you may want to check out their site. The link for Jedwards is listed on the left tool bar. They ship within the US, so I am not sure where you’re located. Hope this helps.
LikeLike